Cookie Johnson used my Salesforce Web Form
We don’t use no stinkin’ Google forms!

Need to collect a ‘lil bit of info in Salesforce? Don’t want to manually process google forms to get the info into your Salesforce org? My solution — web to lead. In this post, I’ll be talking about Web to Lead, but you can pretty much sub out Case for Lead and it’s the same thing. The difference is whether you want the info to create a Lead or a Case record when it’s submitted.
What is a web to lead? Create your own HTML form using the same fields in your Salesforce org. Attach it to your website for clients to access and when they submit the web to lead form, the information in each field is mapped directly into the field of a Lead record.
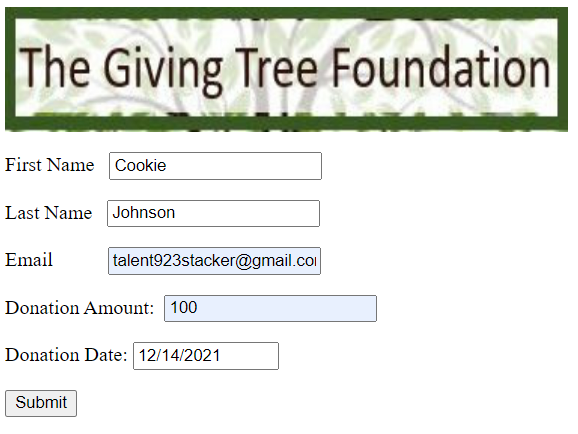
In The Giving Tree Foundation donation management project created for Talent Stacker, Abby and I created this HTML web to lead form. It asks just enough basic questions to create a Lead record. But notice how we were able to include the logo? Ooo, that’s nice!

Who and where do you create a web to lead form? System Admins — Click on the gear icon, then click on Setup to go to a back facing Salesforce page. Put on your hard hat because only System Admins looking to build something can see this page. Salesforce End Users who don’t have System Admin permission cannot build nor can they see this page. From the Setup / Home tab, type in web and click on Web to Lead in the menu below. The Web to Lead page will appear.

Make sure Web to Lead is enabled. Click on the Edit button to be directed to the Settings page. Click on Web to Lead Enabled and optionally, check the Require reCAPTCHA Verification box. You can designate any User as the Default Lead Creator and attach a Default Response Template.

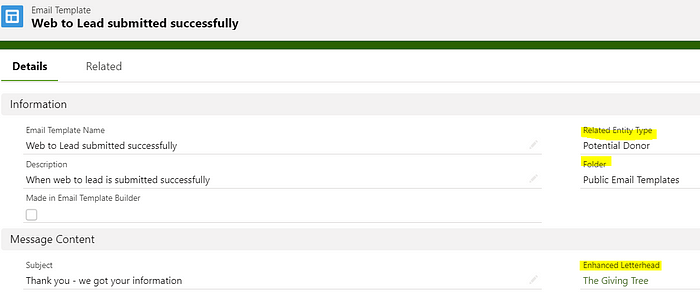
In this project, we created an email template with a general message that the potential donor’s information was successfully submitted and a GTF representative would contact them shortly. When you create the email template, be sure to put the Lead object in the Related Entity Type field. We customized the label to Potential Donor, but it was originally called “Lead.” Putting it into a Public Email Template folder allows other users to access it. And personalize it by creating an Enhanced Letterhead. [To learn how to create an Enhanced Letterhead, read my post, “Making YOU Shine.”]
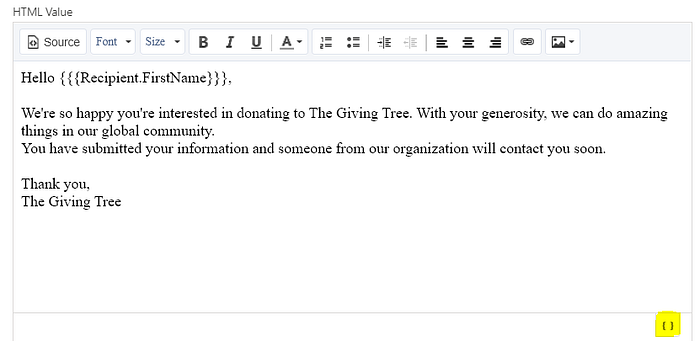
Then enter your email message and use merge fields to customize the letter. The icon highlighted below is the merge field link. Click Save and you’re set.
Now, to create the Web to Lead, click on the Create Web to Lead form button:

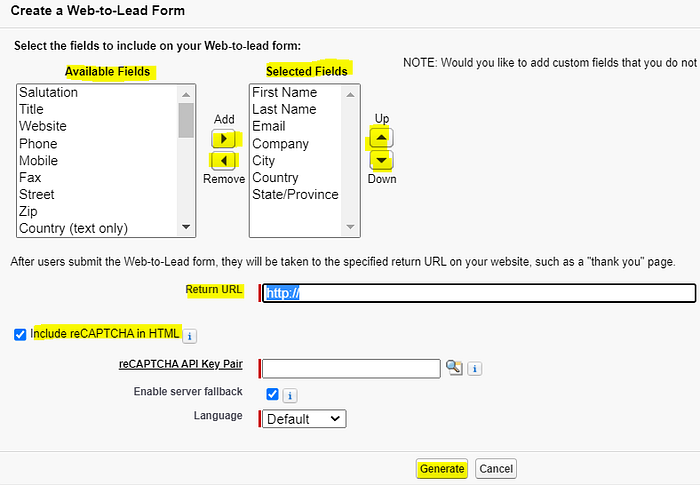
A pop up screen will appear, where you select what fields will be included on the web to lead form. Wait, stop! Do your fields already exist? Well, the field has to already be created on the Potential Donor (Lead) object in order for it to be available here. Use the < or > arrow to select & move fields into the Selected Fields box. Then use the up/down arrows to order the fields how you want them to appear on the web to lead form. Next, enter in the Return URL. I suggest using your companies website, but taking the user to a Google home page is acceptable too. Optionally, click on Include reCAPTCHA in HTML. Then click Generate.
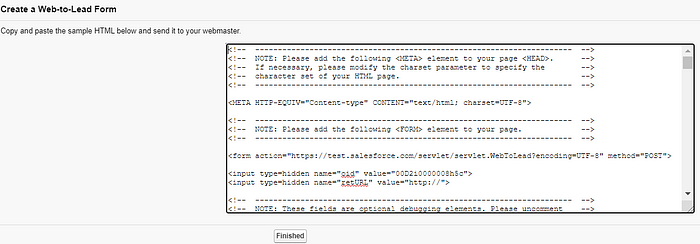
Once you hit Generate, the gobbetty goop coding language appears. You can’t make revisions. You’ll have to recreate it if you need to modify it again. Copy the entire string of code, paste it onto a Notepad and save it as an HTML file. The HTML file is what you embed onto your website that becomes a button link to the web to lead form. Going back to the screen shot below, if you click on Finished, it just takes you back to the first page to create a new Web to Lead form.
Remember earlier, when I called out that our logo was added to the HTML? Here’s where we snuck that code in:
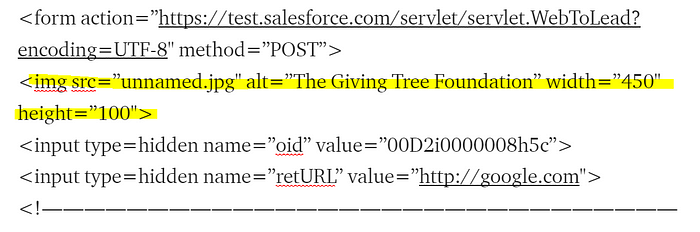
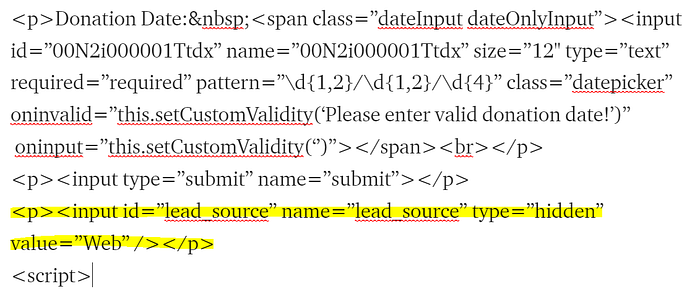
In our Salesforce org, there is a field called Lead Source with several picklist values that define where the lead came from. We wanted all lead records that originated from this web to lead form to automatically have the value “Web” in the field. Web is a picklist value option of the existing Lead Source field so we know it will be accepted upon submission. If we put a value that did not exist on the picklist, then the info would be rejected. And since it’s a value that can be applied to all the submitted web to lead forms, we hid the field in the HTML and defaulted it to “web.” That mean’s no one has to manage this. It’s now automatically done for the User.
HERE WE GO… let’s test out the web to lead form using my favorite test person, Cookie Johnson! Not only is her name awesome, she’s so beautiful!

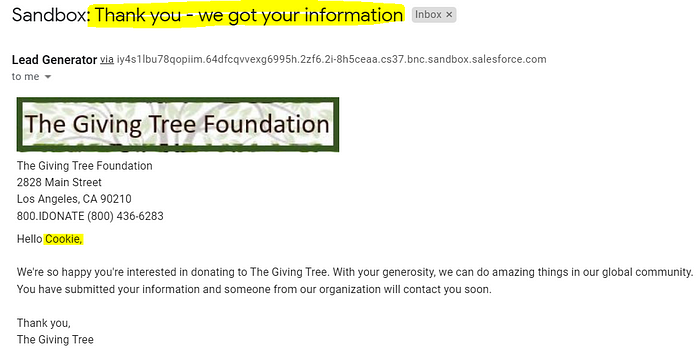
So Cookie submitted her form and here’s what happened…
- Cookie was taken to the Google URL after she hit Submit:
2. Cookie received a confirmation email that GTF has received her info. This was done through the Lead Auto Response Rule. When the criteria Lead Source = Web is met, the system auto sends an email from the Lead Generator to the person submitting (Cookie) using the email template selected:

Here’s what the email looks like:
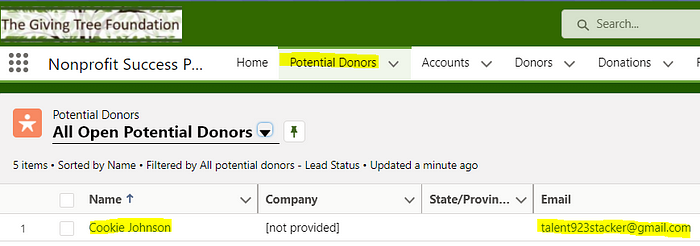
3. A Lead record for Cookie Johnson was created in Salesforce and the User can find it on the Potential Donors (Leads) tab:
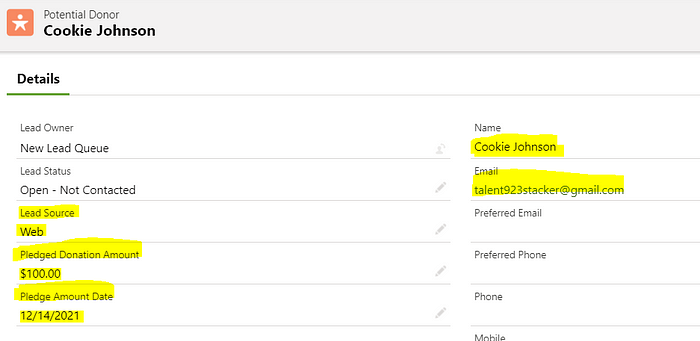
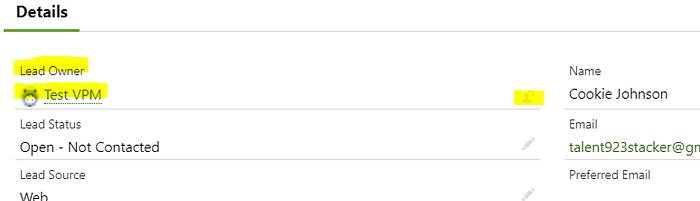
When the User clicks on Cookie Johnson, it takes them to Cookie’s record where all the info has been stored. Cookie entered all the highlighted info except “Web” (remember “web” was defaulted in the HTML code):
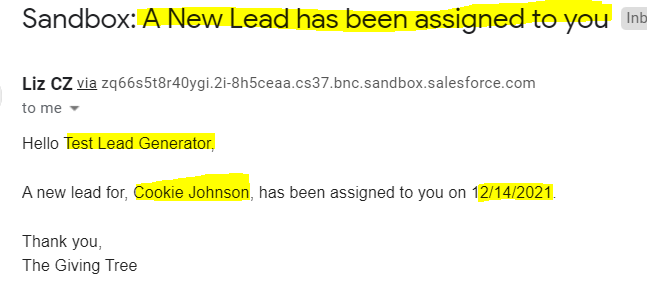
4. An email was automatically sent to a GTF associate, the Lead Generator, alerting them that a new lead record has entered the Salesforce org that needs their attention.
Now, it’s up to the Lead Generator at The Giving Tree Foundation to manage the leads that come into the New Lead Queue. Their job is to change the record owner to the Volunteer Project Manager. Now we wait for the donations to come in!
Thanks for the donation, Cookie and family!
Mahalo,
Lizette