List Views
It’s the cherry on top!

List Views are very cool and super under-rated. Imagine this scenario…
It’s a hot summer day and you want ice cream. So you go online to order some. Step 1, pick your cone. Sugar cone — every time.

Step 2, it’s time to pick your ice cream flavor and [Whoa!] the list is so long…The list includes every flavor from every ice cream brand and you already know that you want Cherry Garcia by Ben and Jerry’s! But you have to scroll through all the choices to find it.

List Views let you quickly see specific segments of your data. For example, you can create individual list views for Ben and Jerry’s, Baskin Robbins, and Haagen Dazs. And have even more list views for Ice Cream, Sorbet, Sugar-Free, and Vegan. You don’t have to build a report to do this — you just need to sort by one field (such a brand or type), save the filtered list and you can come back to the list at any time.
In the Hawaii Literacy project, they had many contacts. And there were many different segments of contacts like Students, Tutors, Contacts living on Oahu, Contacts living on Hawaii, etc and it was easier to manage the volunteers by segment. So we created a list view for each segment.

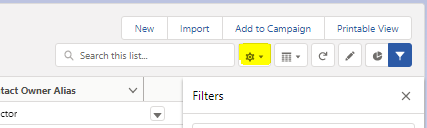
Start from All Contacts and click on the filter icon

And pow, there’s the filter to create your segment

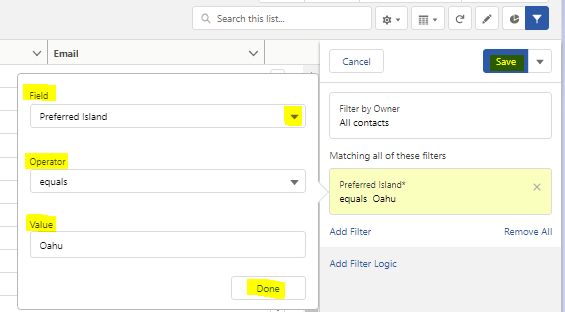
When you click on the Field drop down menu arrow, all contact Fields become available to filter by (eg Preferred Island). Select your Operator (eg equals, greater than/less than, contains, etc) then enter in the Value you want to filter to (eg Oahu). Click Done. But you’re not really done…you have to click on Save!
Voila, you have a list of contacts that live on Oahu. Yay, the list is much shorter! Now take a look at the fields across the top of the list. You know you can change those- right? Looks like Title isn’t very helpful, so let’s take that one out and add a field that is more informative.

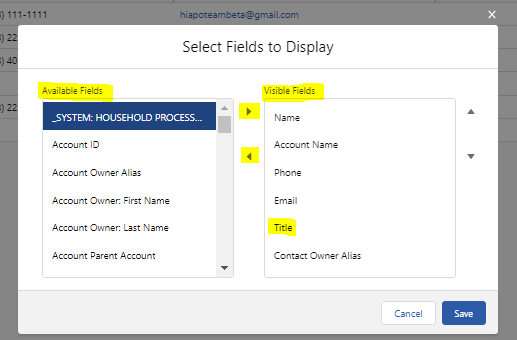
Find the gear icon in the top right corner and choose Select Fields to Display
A pop up box will appear with Available Fields vs. Visible Fields; move the fields using the arrows as necessary. Visible Fields will appear across the top of the list view. You can even change the order of a Visible Field by using the up and down arrows on the far right. For now, we’ll take the Title field out of the Visible Fields and move it to Available Fields and we’ll add Student and Tutor fields into the Visible Fields, then Save.
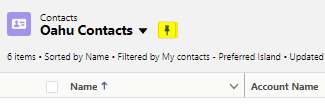
This is what the new displayed fields look like. So now you have a list of all contacts living on Oahu and you can see the checkbox that indicates if they’re a student or a tutor.

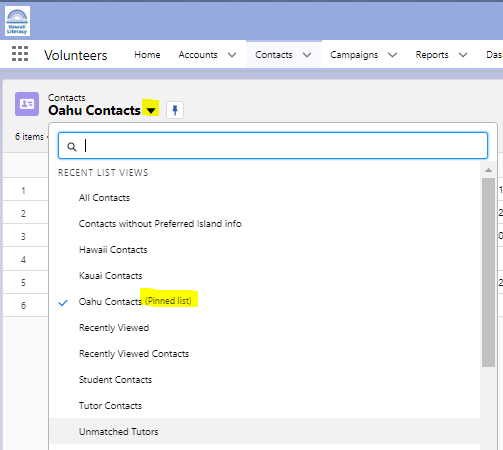
When you’re done making all your list views, you may find that you have a favorite list that you use more often. Consider pinning it so it becomes the default list when you open the Contact tab. “Oahu Contacts” is currently not pinned (diagonal).

To pin it, click on the pin icon so it becomes vertical. Now it’s pinned!
Every time you click on the Contact tab, this is the list you will see. And when you click on the drop down menu arrow to show all list views, it even tells you which one is currently pinned. Pin and unpin list views as much as you want — don’t worry, you’re not leaving holes in the wall!
Now that I’ve taught you all about List Views, I’m craving an ice cream! Join me next week to discover a new feature on the Hawaii Literacy project.
Mahalo,
Lizette